In popularizing Linux containers, Docker brought about a new era of systems design based on these lightweight platforms, rather than heavy virtual machines. However, now that Docker is slowly declining, it’s time to learn about the next generation of Linux container tools.
Docker
When Docker officially launched in 2013, it was not the first containerization solution for Linux. For example, Linux already had LXC back in 2008 (early versions of Docker ran on top of it), and FreeBSD jails had been around since 1999. Nevertheless, Docker was the first developer-friendly and complete end-to-end solution that let us easily create, distribute, and run Linux containers.
Not only was it technically sound and convenient to use, but Docker was also a great example of a successful and well-run open source project. I experienced this personally during a couple of contributions where two people did the initial review within 24h of my Pull Request and a third person merged it in less than two weeks from the submission date. Docker developers also contributed back to Linux plenty of containerization-related improvements, started drove standardization efforts, and spun off many subcomponents (e.g., containerd, OCI, BuildKit).
Today, container-based system architectures and development workflows are extremely popular, as seen with, for instance, the rise of Kubernetes. While we are still waiting for the ‘year of the Linux desktop’ to happen, Docker did certainly make more Windows and Mac users run a virtual Linux machine on their laptops than ever before.
The company Docker Inc was, from the start, a venture-funded endeavor centered around an open core model and launched many closed-source products that drove revenue over the years. What used to be the core Docker software was renamed Moby in 2017, and that is where the open-source contributions (e.g., mine from 2015) can be found. The founder Solomon Hykes no longer works for Docker Inc, and in recent years public sentiment around Docker has suffered due to various controversies. Yet at the same time, many similar (and some perhaps better) solutions have entered the space.
What actually is a Docker container?
To build a container, a software developer first writes a Dockerfile, which defines what Linux distribution the container is based on along with what software and configuration files and data it has. Much of the Dockerfile contents are basically shell script.
The build is done with command docker build, which executes the contents of the Dockerfile line-by-line and creates a Linux-compatible root filesystem (files under /). This is done utilizing a clever overlay filesystem, where each line in the Dockerfile amounts to one new layer. Thus, rebuilds of the container do not need to rebuild the whole filesystem, but can just execute the Dockerfile lines that changed from the previous build.
On a typical Linux system, the filesystem layers after a docker build execution can be found at /var/lib/docker/. If the container was based on Debian, one could find, for example, the apt-get binary of the image at a path like /var/lib/docker/overlay2/c1ead1[...]d04e06/diff/usr/bin/apt-get.
Additionally, some metadata is created in the process, which designates among other things the entrypoint of the container — i.e. what binary on the root filesystem to run when starting the container.
Unpacking a container
To inspect what the root filesystem of the Docker image debian:sid looks like, one could create a container and inspect the mounted merged filesystem:
$ docker container create -i -t --name demo debian:sid
2734eb[...]d18852
$ cat /var/lib/docker/image/overlay2/layerdb/mounts/2734eb[...]d18852/mount-id
2854c7[...]9dfe25
$ find /var/lib/docker/overlay2/2854c7[...]9dfe25 | grep apt-get
/var/lib/docker/overlay2/2854c7[...]9dfe25/merged/usr/share/man/man8/apt-get.8.gz
/var/lib/docker/overlay2/2854c7[...]9dfe25/merged/usr/share/man/pt/man8/apt-get.8.gz
/var/lib/docker/overlay2/2854c7[...]9dfe25/merged/usr/bin/apt-getThe command docker export makes it easy to get the root filesystem into a tar package, for example.
$ docker export demo > debian-sid.tar
$ tar xvf debian-sid.tar
.dockerenv
bin
boot/
dev/
dev/console
dev/pts/
dev/shm/
etc/
etc/.pwd.lock
etc/alternatives/
etc/alternatives/README
etc/alternatives/awk
...
var/spool/mail
var/tmp/
$ find . | grep apt-get
./usr/share/man/man8/apt-get.8.gz
./usr/bin/apt-getIn theory, anything could create this root filesystem, and likewise anything starting could run a binary inside it — even the classic chroot. If you edit the files and want to get them back into Docker to run as a container, docker import makes it easy.
To export a full container image with both the root filesystem and the metadata, the docker buildx command offers some output format options, such as the Open Container Initiative standard format or the Docker native image format. To import a full container image with metadata, refer to the docker load command.
Orchestrating a container start with dockerd, containerd and runc
In the above example, a container was created, but not started. To start a container, one can try running:
$ docker run -it debian:sid bash
root@c9a8e6c222ae:/#From a user experience point of view, you are basically dropped into a Bash shell in a Debian Sid container. Under the hood, the docker command-line tool sends an HTTP request to the dockerd daemon running on the local system, which in turn asks containerd to run the container, which in turn starts runc directly or (due to backwards compatibility reasons) a containerd-runc-shim. Inside this one, you can find the actual running Bash binary:
$ ps fax | grep -C container
1122 /usr/bin/containerd
1660 /usr/bin/dockerd -H fd:// --containerd=/run/containerd/containerd.sock
55409 /usr/bin/containerd-shim-runc-v2 -namespace moby -id c9a8e[..]0847e -address /run/containerd/containerd.sock
55428 \_ bashAnyway, if you’re fine with slightly less automation and having more of a “hands-on” experience, read the man page for runc and try running the container directly with it.
Alternatives in the Linux containers stack
The Linux Foundation has a nice architecture schema to illustrate the various components and alternatives in the stack that originally evolved from Docker:
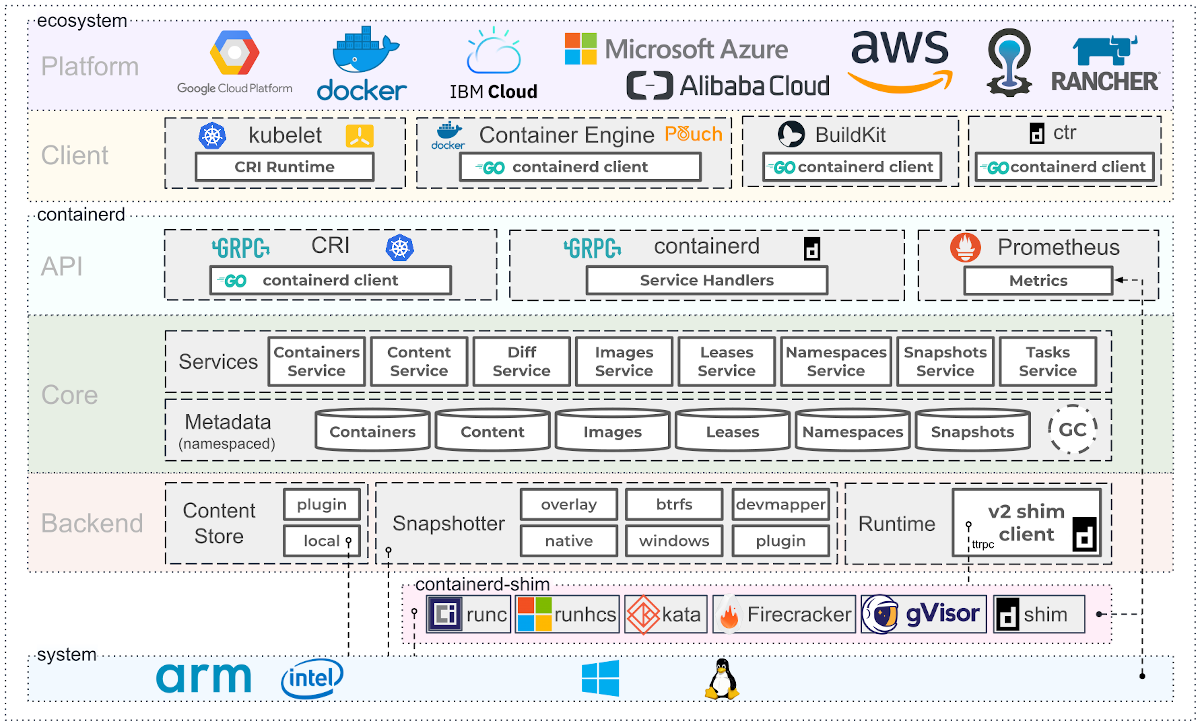
The runc is the OCI reference implementation of their runtime specification. Popular alternatives to runc include: crun (implemented in C to be faster and use less memory than runc, which is in Go) and CRI-O (smaller and faster, with just enough features to be perfect for Kubernetes).
There are also container runtimes such as Kata and ZeroVM based on the idea of running each container inside a minimal virtual machine, which achieve better isolation between the containers compared to running them directly on the same host. This design aims to hit a “sweet spot” between the optimized performance of lightweight containers and the security of traditional full virtual machines.
Podman
Missing from the diagram above is the current major competitor, the Red Hat-sponsored Podman, which offers a complete replacement for the whole Docker stack.
The command-line tool podman is designed to be a drop-in-replacement for docker, so one can run the earlier command examples by just changing the first word: podman build .., podman container create ..., podman export .. and so forth. Even podman volume prune --force && podman system prune --force does exactly the same as the Docker equivalent — which is nice, as I tend to run that frequently to clean away containers and free disk space when I’m not actively using them.
To start a container one can run (for example):
$ podman run -it debian:sid bash
root@312cbccb5938:/#When a container started like this is running, you would see in the process list something along the lines of:
87524 \_ podman
99902 \_ /usr/libexec/podman/conmon --api-version 1 -c 312cbc[...]93a0e1 -u 312cbc[...]93a0e1 -r /usr/bin/crun
-b /home/otto/.local/share/containers/storage/overlay-containers/312cbc[...]93a0e1/userdata
-p /run/user/1001/containers/overlay-containers/312cbc[...]93a0e1/userdata/pidfile -n naughty_dewdney
--exit-dir /run/user/1001/libpod/tmp/exits --full-attach -l journald --log-level warning --runtime-arg
--log-format=json --runtime-arg --log
--runtime-arg=/run/user/1001/containers/overlay-containers/312cbc[...]93a0e1/userdata/oci-log -t
--conmon-pidfile /run/user/1001/containers/overlay-containers/312cbc[...]93a0e1/userdata/conmon.pid
--exit-command /usr/bin/podman --exit-command-arg --root
--exit-command-arg /home/otto/.local/share/containers/storage --exit-command-arg --runroot
--exit-command-arg /run/user/1001/containers --exit-command-arg --log-level --exit-command-arg warning
--exit-command-arg --cgroup-manager --exit-command-arg cgroupfs --exit-command-arg --tmpdir
--exit-command-arg /run/user/1001/libpod/tmp --exit-command-arg --runtime --exit-command-arg crun
--exit-command-arg --storage-driver --exit-command-arg overlay --exit-command-arg --events-backend
--exit-command-arg journald --exit-command-arg container --exit-command-arg cleanup
--exit-command-arg 312cbc[...]93a0e1
99905 \_ bashUnlike Docker, there is no containerd or runc at play, but instead conmon runs crun, which is the actual container runtime. Note also that the container runs with regular user permissions (no need for root) and that the default location for storing container images and other data is in ~/.local/share/containers/ in the user home directory.
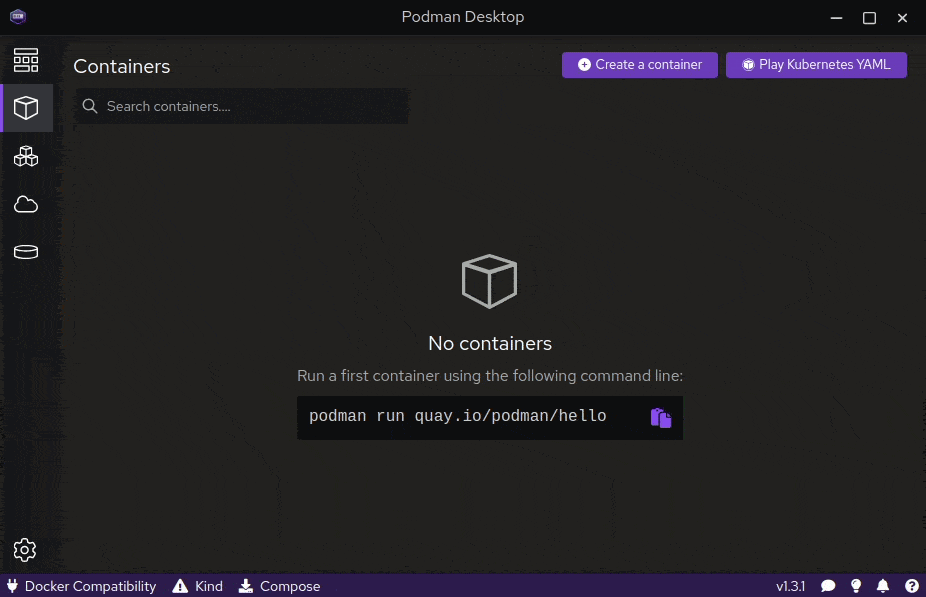
Podman desktop
While I personally prefer to work on the command-line, I need to give a shoutout to Podman for also having a nifty desktop application for those who prefer to use graphical tools:
LXC and LXD
The basic utility of Linux containers is to give system administrators a building block which behaves a bit like a virtual machine in terms of being an encapsulated unit — but without being so slow and resource hungry as actual virtual machines! Although containers typically boast a full root filesystem, the Docker philosophy was that each container should run just one process — and run it well — and crucially, not have any process managers or init systems inside the container. Many system administrators, however, do in practice run Docker containers that use, as an example, runit to ‘boot’ the container and manage server daemon processes inside them.
The Canonical-backed LXD however tailors itself specifically for this type of use case, building upon LXC. After installing LXD and running lxd init to configure it, you can run full containerized operating systems with:
$ lxc launch images:debian/sid demo
Creating demo
Starting demo
$ lxc exec demo -- bash
root@demo:~#The host process list will show something along the lines of:
root 105632 lxcfs /var/snap/lxd/common/var/lib/lxcfs -p /var/snap/lxd/common/lxcfs.pid
root 105466 /bin/sh /snap/lxd/24061/commands/daemon.start
root 105645 \_ lxd --logfile /var/snap/lxd/common/lxd/logs/lxd.log --group lxd
lxd 105975 \_ dnsmasq --keep-in-foreground --strict-order --bind-interfaces --except-interface=lo
--pid-file= --no-ping --interface=lxdbr0 --dhcp-rapid-commit --quiet-dhcp --quiet-dhcp6
--quiet-ra --listen-address=10.199.145.1 --dhcp-no-override --dhcp-authoritative
--dhcp-leasefile=/var/snap/lxd/common/lxd/networks/lxdbr0/dnsmasq.leases
--dhcp-hostsfile=/var/snap/lxd/common/lxd/networks/lxdbr0/dnsmasq.hosts
--dhcp-range 10.199.145.2,10.199.145.254,1h --listen-address=fd42:3147:bafe:37e5::1
--enable-ra --dhcp-range ::,constructor:lxdbr0,ra-stateless,ra-names -s lxd
--interface-name _gateway.lxd,lxdbr0 -S /lxd/
--conf-file=/var/snap/lxd/common/lxd/networks/lxdbr0/dnsmasq.raw -u lxd -g lxd
...
root 107867 \_ /snap/lxd/current/bin/lxd forkexec demo /var/snap/lxd/common/lxd/containers
/var/snap/lxd/common/lxd/logs/demo/lxc.conf 0 0 0
-- env PATH=/usr/local/sbin:/usr/local/bin:/usr/sbin:/usr/bin:/sbin:/bin HOME=/root
USER=root LANG=C.UTF-8 TERM=xterm-256color
-- cmd bash
1000000 107870 \_ bash
root 106209 [lxc monitor] /var/snap/lxd/common/lxd/containers demo
1000000 106221 \_ /sbin/init
1000000 106372 \_ /lib/systemd/systemd-journald
1000000 106401 \_ /lib/systemd/systemd-udevd
1000997 106420 \_ /lib/systemd/systemd-resolved
1000100 106431 \_ /usr/bin/dbus-daemon --system --address=systemd: --nofork --nopidfile --systemd-activation
--syslog-only
1000000 106433 \_ /lib/systemd/systemd-logind
1000000 106436 \_ /sbin/agetty -o -p -- \u --noclear --keep-baud - 115200,38400,9600 linux
1000998 106446 \_ /lib/systemd/systemd-networkdNotice how the daemon runs as root (and interacting with lxd/lxc requires root permissions). However, thanks to UID mapping, the root user inside the container is not a root user as found on the host system. This is one of the key design differences — and why LXD is considered more secure than Docker.
The downloaded root filesystems are stored at /var/snap/lxd/common/lxd/images/ while the filesystems of running containers can be found at /var/snap/lxd/common/lxd/storage-pools/default/containers/ as long as the LXD storage is directory-based (as opposed to a LVM or OpenZFS pool).
The examples above all have snap in their path, as there is no native Ubuntu package for LXD…but it forces users to install a Snap even when running apt install lxd.
As lxd controls the whole system, the command for managing individual containers is lxc:
$ lxc list
+------+---------+---------------------+-----------------------------------------------+-----------+-----------+
| NAME | STATE | IPV4 | IPV6 | TYPE | SNAPSHOTS |
+------+---------+---------------------+-----------------------------------------------+-----------+-----------+
| demo | RUNNING | 10.199.145.6 (eth0) | fd42:3147:bafe:37e5:216:3eff:fe01:8da8 (eth0) | CONTAINER | 0 |
+------+---------+---------------------+-----------------------------------------------+-----------+-----------+
$ lxc delete demo --forceErgo, the process of creating LXC compatible container images is fairly simple. One can use any container builder to create the root filesystem (the LXC docs recommend using deboostrap directly), and the basic metadata yaml file is so brief, it can be written manually. These are then imported to LXC with lxc image import metadata.tar.gz rootfs.tar.gz --alias demo.
The whole LXD stack ships with integrated tooling — even offering metal-as-a-service capabilities (MAAS) — so it goes way beyond what the Docker stack has.
So, where are we headed?
To fully grasp how containers actually work, you should read the Linux kernel documentation on namespaces and permission control via capabilities. Keeping an eye on the progress of the Open Container Initiative will keep you right on top of the latest developments, and considering OCI compatibility in your infrastructure will enable you to migrate between Docker, Podman, and LXD easily.
Choosing the right container technology to use depends on where you intend to ship your containers. For developers targeting Kubernetes compatible production environments, Podman probably makes the most sense at the moment. Or, if your infrastructure consists of a lot of virtualized Ubuntu hosts and you want to have more flexibility, LXD is probably a good choice.
Podman is certainly gaining a lot of popularity according to Google Trends. Docker will, however, continue to have the largest mindshare among average developers for years to come. For now, my recommendation is for all systems administrators and software architects to try and understand how these tools you rely on actually work — by getting your hands dirty with them. Choose the solutions you understand best, and keep an eye on the horizon for what’s coming next!